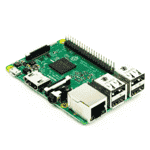
So as mentioned in another thread, had finally decided to buy Rasberry Pi 3. The good thing about this model is that it comes builtin with wifi and bluetooth unlike previous models. I will share what I do with it and how I do it so if anyone wants to buy one they can follow this thread.
Let us start by knowing what is Rasberry Pi
What is Rasberry Pi?
The Raspberry Pi is a low cost, credit-card sized computer that plugs into a computer monitor or TV, and uses a standard keyboard and mouse. It is a capable little device that enables people of all ages to explore computing, and to learn how to program in languages. It comes with Python and Java out of the box.
How many models are there for Rasberry Pi?
There are 6 models of Rasberry Pi.
1. Pi Zero
2. Pi Zero W
3. Pi Model 1 A +
4. Pi Model 2 B +
5. Pi Model 2 B
6. Pi Model 3 B (latest)
What are the specs?
Rasberry Pi Model 3 B comes with

How much does it cost?
The Rasberry Pi alone as a board is shipped for $35. It requires a SD card(acts as your Storage), a power adapter(sold separately), a screen depending if you dont have one, keyboard, mouse and a case.
Now it seems a lot when you have to buy all but trust me a $100 kit will give you everything. Rasberry Pi with its specs runs Rasbian version of Linux. You can install other images too. With its particular use you need a maximum of 32-64 GB sd card which costs $20. A 7 inch touch screen costs $30 and power adapter costs $10. Now there are companies like CanaKit | Electronic Kits & Modules | Arduino | Embedded Electronics | Parts & Components | Electronic Tutorials which will sell you a bundle like the one I bought for $69. My kit includes SD card, Case, Power Adapter, HDMI cable, Heat pads. I use my extra tv I have at home as my screen. If I add screen thats only $100
Whats so good about Rasberry Pi?
Since the Pi boots up from SD Card, you can have different OS's running. Buy one SD card per OS. I got one from the kit and had an old one in house which I use for a cool OS RetroPie.
RetroPie converts your Rasberry Pi into cool retro gaming console. You install this OS and add the ROM's and bam you can play NES, N64, GBA, GBC, Playstation1, Atari all games using controllers or keyboard.
My Plan Ahead...
Currently as mentioned in another thread, my Rasberry Pi after installing Apache Server is acting as my host. I have given my Rasberry Pi a static IP and forwarded port to go to my Pi. I already owned a domain which I just forward it now. This way I have a one time paid unlimited hosting.
This is just my short term goal. My long term goal is to build a solid hardware/software product.
I am currently playing with normal Rabsbian OS which is acting as my server and Retro Pie which I play cool games like Fifa 98, Mario, Donkey Kong, Contra etc.
I want to eventually integrate a 7 inch touch screen with RetroPie and play around with it. I will also be building one of the coolest project ever built on Rasberry Pi and that is a Smart Mirror
I am pretty excited.


Let us start by knowing what is Rasberry Pi
What is Rasberry Pi?
The Raspberry Pi is a low cost, credit-card sized computer that plugs into a computer monitor or TV, and uses a standard keyboard and mouse. It is a capable little device that enables people of all ages to explore computing, and to learn how to program in languages. It comes with Python and Java out of the box.
How many models are there for Rasberry Pi?
There are 6 models of Rasberry Pi.
1. Pi Zero
2. Pi Zero W
3. Pi Model 1 A +
4. Pi Model 2 B +
5. Pi Model 2 B
6. Pi Model 3 B (latest)
What are the specs?
Rasberry Pi Model 3 B comes with
- Quad Core 1.2GHz Broadcom BCM2837 64bit CPU
- 1GB RAM
- BCM43438 wireless LAN and Bluetooth Low Energy (BLE) on board
- 40-pin extended GPIO
- 4 USB 2 ports
- 4 Pole stereo output and composite video port
- Full size HDMI
- CSI camera port for connecting a Raspberry Pi camera
- DSI display port for connecting a Raspberry Pi touchscreen display
- Micro SD port for loading your operating system and storing data
- Upgraded switched Micro USB power source up to 2.5A

How much does it cost?
The Rasberry Pi alone as a board is shipped for $35. It requires a SD card(acts as your Storage), a power adapter(sold separately), a screen depending if you dont have one, keyboard, mouse and a case.
Now it seems a lot when you have to buy all but trust me a $100 kit will give you everything. Rasberry Pi with its specs runs Rasbian version of Linux. You can install other images too. With its particular use you need a maximum of 32-64 GB sd card which costs $20. A 7 inch touch screen costs $30 and power adapter costs $10. Now there are companies like CanaKit | Electronic Kits & Modules | Arduino | Embedded Electronics | Parts & Components | Electronic Tutorials which will sell you a bundle like the one I bought for $69. My kit includes SD card, Case, Power Adapter, HDMI cable, Heat pads. I use my extra tv I have at home as my screen. If I add screen thats only $100
Whats so good about Rasberry Pi?
Since the Pi boots up from SD Card, you can have different OS's running. Buy one SD card per OS. I got one from the kit and had an old one in house which I use for a cool OS RetroPie.
RetroPie converts your Rasberry Pi into cool retro gaming console. You install this OS and add the ROM's and bam you can play NES, N64, GBA, GBC, Playstation1, Atari all games using controllers or keyboard.
My Plan Ahead...
Currently as mentioned in another thread, my Rasberry Pi after installing Apache Server is acting as my host. I have given my Rasberry Pi a static IP and forwarded port to go to my Pi. I already owned a domain which I just forward it now. This way I have a one time paid unlimited hosting.
This is just my short term goal. My long term goal is to build a solid hardware/software product.
I am currently playing with normal Rabsbian OS which is acting as my server and Retro Pie which I play cool games like Fifa 98, Mario, Donkey Kong, Contra etc.
I want to eventually integrate a 7 inch touch screen with RetroPie and play around with it. I will also be building one of the coolest project ever built on Rasberry Pi and that is a Smart Mirror
I am pretty excited.


![Contra III - The Alien Wars (U) [!]-170924-181616.png Contra III - The Alien Wars (U) [!]-170924-181616.png](https://www.planetcricket.org/forums/data/attachments/161/161513-8ab6534a596d6f9d40b6de55cf4ef322.jpg)


![Contra III - The Alien Wars (U) [!]-170924-180518.png](/forums/data/attachments/161/161511-b82562a5376c6c1408f367c82d8c97d7.jpg)


 No excuses there but I actually wanted to take a screen shot, I had an option of going for good jump or screenshot, I took the later


