- Home
- Forums
- Classic Cricket Games
- Older Cricket Games
- Brian Lara International Cricket 2005 Forum
- Brian Lara International Cricket 2005 Downloads
Changing BLIC/RPIC to Another Player tutorial
- Thread starter hondeyho
- Start date
madmick96
Club Cricketer
how do you outline the font. E.G Andrew Flintoff with the white highlight behind it?
madmick96
Club Cricketer
how do you the overlay thing with all those 1-6 start .dds files?
i mean like sticking them all together.
i mean like sticking them all together.
showhimmymotto
Club Cricketer
Adam Gilchrist
hers mine,
edit: i fixed the line now, to see the right one go to form title: Adam Gilchrist International Cricket 2005

hers mine,
edit: i fixed the line now, to see the right one go to form title: Adam Gilchrist International Cricket 2005
Last edited:
hondeyho
International Cricketer
- Joined
- Sep 12, 2005
- Online Cricket Games Owned
OK, in this tutorial I shall show you how to make 3 different types of backgrounds. Each one with a futuristic effect. Hopefully by the end of this you'll be able to produce something like this, (sorry about the Herschelle Gibbs thing hasun - I couldn't think of anything else):

The first one I shall show you is the Radial Background.
1. Start with your document with the size being 638x512 and fill the background in black
2. Start squiggling around with a white brush until you are happy with it - like so:

3. Go to Filter -> Blur -> Radial Blur - make the settings exactly the same as these:

4. Repeat this 4-5 times by pressing Ctrl+F
5. Go to Filters -> Sketch -> Chrome - make the settings exactly the same as these:

6. Go to Filter -> Blur -> Radial Blur - make the settings exactly the same as these:

7. Create a new layer and change its style to Color, then choose whatever colour you want to go on top of it and you should have a finished result like this:

I shall post some more background tutorials later on tonight - and how to make it look even MORE effective
The first one I shall show you is the Radial Background.
1. Start with your document with the size being 638x512 and fill the background in black
2. Start squiggling around with a white brush until you are happy with it - like so:
3. Go to Filter -> Blur -> Radial Blur - make the settings exactly the same as these:
4. Repeat this 4-5 times by pressing Ctrl+F
5. Go to Filters -> Sketch -> Chrome - make the settings exactly the same as these:
6. Go to Filter -> Blur -> Radial Blur - make the settings exactly the same as these:
7. Create a new layer and change its style to Color, then choose whatever colour you want to go on top of it and you should have a finished result like this:
I shall post some more background tutorials later on tonight - and how to make it look even MORE effective
Last edited:
showhimmymotto
Club Cricketer
awsome thanx man, but can u show us hhow to put pics in the background like for the gibbs one theres like a semi coored pic in the back
hondeyho
International Cricketer
- Joined
- Sep 12, 2005
- Online Cricket Games Owned
I'll get to that later on - right now on to the next step of the tutorial. This part is very hard and definetly requires Photoshop. The results can be stunning though.
1. We have our original background as shown in Tutorial one - now create a new layer and go to Gradient.

2. Create your Gradient and set the style to Difference like so - now heres the fun part!

3. Use all the different Gradients except Angle and just randomly create gradients - don't worry about the colour we can fix that later. Repeat it many times and you should have something like this:

4. Looking pretty sweet at the moment - but we can make it look even better. Duplicate the Layer you have been using and flip the duplicated layer horizontally like so:

5. Now change the layer style to 'Lighten', and it should look pretty sweet now. Press Ctrl+E to merge the two layers together

6. Now repeat steps 4 & 5 except this time flip the layer vertically and you should end up with something like this:

7. Create a new layer and change it's style to Color. Fill it with any colour you want to.
8. Finally change the transparency of the 'Gradient Layer' so you can still see the original background you made. It should now look a little like this:

Right, later on tonight I shall post of Tutorial 3 - Finishing things off. Different styles and such-forth.
1. We have our original background as shown in Tutorial one - now create a new layer and go to Gradient.
2. Create your Gradient and set the style to Difference like so - now heres the fun part!
3. Use all the different Gradients except Angle and just randomly create gradients - don't worry about the colour we can fix that later. Repeat it many times and you should have something like this:
4. Looking pretty sweet at the moment - but we can make it look even better
. Duplicate the Layer you have been using and flip the duplicated layer horizontally like so:
5. Now change the layer style to 'Lighten', and it should look pretty sweet now. Press Ctrl+E to merge the two layers together
6. Now repeat steps 4 & 5 except this time flip the layer vertically and you should end up with something like this:
7. Create a new layer and change it's style to Color. Fill it with any colour you want to.
8. Finally change the transparency of the 'Gradient Layer' so you can still see the original background you made. It should now look a little like this:
Right, later on tonight I shall post of Tutorial 3 - Finishing things off. Different styles and such-forth.
hondeyho
International Cricketer
- Joined
- Sep 12, 2005
- Online Cricket Games Owned
OK, still no feedback whatsoever but I would like some after this - here are the final stages of the tutorial
Right there are two styles you can make:
Style 1:

Style 2:

Right so by now we should have our original background which was made in tutorials 1 & 2. So first of all I shall do Style 1
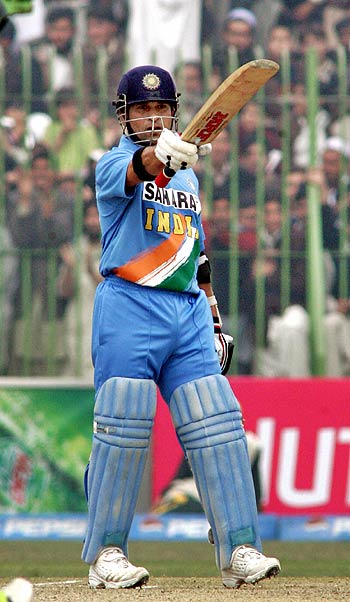
1. First of all you need two pictures of the player you have chosen - one of the whole body and one of the upper body like these two:

2. Now we have the pictures remove the background from them and on the upper body one make sure there are NO STRAIGHT EDGES - use the smudge tool if there are any, you should now have two pictures like this:

3. Right now you should insert the two pictures into the picture as two seperate layers - but you have to place them specially. Put the upper body image behind the Color layer, and the whole body image infront of the Color layer, like so:

4. OK now change the Opacity of the Upper Body Image to 88%, and the Whole Body Image to 75%. We are now done with the pictures and it should look a little like this:

5. The text I used for this is Xirod and you can get it from here
Right now type your text - in my case Sachin Tendulkar and place it wherever you want. Preferably in a space. Play around with the text and see what you come up with - then you should hopefully have a finished product similar to above.
As you can see Style 2 looks better than Style 1 - but it is harder to make, I shall show you how though
1. Go to your Gradient Layer, (not the color layer), and make a Circle - try to make it as perfect as possible. Keep the Circle highlighted
2. Go to Image -> Adjustments -> Brightness/Contrast and fiddle around with it until you've got a colour you're happy with it - it should look a little like this:

3. Keep the Circle highlighted and create a new layer and change it's style to Color. Go to Edit -> Stroke, choose a Darker Colour than your original one and make sure its on the outside.

4. Bevel the layer using the default settings and it should look quite effective
5. Get a Whole Body picture and insert it into the circle as the top layer, make sure it fits in the circle and there is no need to change the Opacity.
6. Now just do the text, once again I used Xirod and played around with it using Photoshop to give it a futuristic look. Hopefully by the end of it, it should look like the above.
Right the background tutorial is complete - hopefully I will be seeing some stunning backgrounds in the next couple of days!
Right there are two styles you can make:
Style 1:
Style 2:
Right so by now we should have our original background which was made in tutorials 1 & 2. So first of all I shall do Style 1
1. First of all you need two pictures of the player you have chosen - one of the whole body and one of the upper body like these two:
2. Now we have the pictures remove the background from them and on the upper body one make sure there are NO STRAIGHT EDGES - use the smudge tool if there are any, you should now have two pictures like this:
3. Right now you should insert the two pictures into the picture as two seperate layers - but you have to place them specially. Put the upper body image behind the Color layer, and the whole body image infront of the Color layer, like so:
4. OK now change the Opacity of the Upper Body Image to 88%, and the Whole Body Image to 75%. We are now done with the pictures and it should look a little like this:
5. The text I used for this is Xirod and you can get it from here
Right now type your text - in my case Sachin Tendulkar and place it wherever you want. Preferably in a space. Play around with the text and see what you come up with - then you should hopefully have a finished product similar to above.
As you can see Style 2 looks better than Style 1 - but it is harder to make, I shall show you how though
1. Go to your Gradient Layer, (not the color layer), and make a Circle - try to make it as perfect as possible. Keep the Circle highlighted
2. Go to Image -> Adjustments -> Brightness/Contrast and fiddle around with it until you've got a colour you're happy with it - it should look a little like this:
3. Keep the Circle highlighted and create a new layer and change it's style to Color. Go to Edit -> Stroke, choose a Darker Colour than your original one and make sure its on the outside.
4. Bevel the layer using the default settings and it should look quite effective
5. Get a Whole Body picture and insert it into the circle as the top layer, make sure it fits in the circle and there is no need to change the Opacity.
6. Now just do the text, once again I used Xirod and played around with it using Photoshop to give it a futuristic look. Hopefully by the end of it, it should look like the above.
Right the background tutorial is complete - hopefully I will be seeing some stunning backgrounds in the next couple of days!
Hariz
International Cricketer
Nice work Hondeyho, you are doing a great job patching BLIC.
showhimmymotto
Club Cricketer
yeah man awsome job thanx alot, this wil really help for the website i have to make for school, thanx
edit:
here's mine, i didnt put the tag yet, can u help me make the helmet better, i dont noe whut u ment by smudge?

edit:
here's mine, i didnt put the tag yet, can u help me make the helmet better, i dont noe whut u ment by smudge?
Last edited:
Wildwil
International Cricketer
Fantastic stuff Blondeyho lol
RabbleRouser
Club Cricketer
Superb tutorials, here's my effort

Wildwil
International Cricketer
I love your work RabbleRouser. Can't you make Jacques Kallis international cricket please.
BTW where did you get those stuff like torch user or FM fanatic?
BTW where did you get those stuff like torch user or FM fanatic?
Similar threads
- Replies
- 42
- Views
- 13K
- Replies
- 23
- Views
- 15K
- Replies
- 6
- Views
- 4K
- Replies
- 10
- Views
- 2K
- Replies
- 53
- Views
- 23K
Users who are viewing this thread
Total: 2 (members: 0, guests: 2)