Programs required
1.fshed005
2.bigGUI
3. Fshed005 Tga plugin
4. Graphics Editor (I will be using Paint Shop Pro 9 for this tutorial)
5. A hex editor (I will be using Ultraedit32). You can get a free one from http://www.download.com/Hackman-Hex-Editor-Lite/3000-2352_4-10354867.html?tag=lst-0-1
----------------------------------------------------------
This tutorial will have 3 sections
1. Graphics
2. XML editing
3. Installing files
-----------------------------------------------------------
1.Graphics
-There is not much I can teach you guys on this as a lot of the TV overlays will be different. What i can teach you is some tools you can use.
3D effects
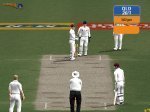
If you want to create a 3D effect as shown below, here is how to do it:
1. Create a new image of whatever size you want but in the power of 2 range. e.g. 640 by 480, 32 by 32, 64 by 32 etc
2. Use the fill tool or something similar to fill image to the desired colour
3. Select All (ctrl + a).
4. Go to effects > 3D Effects. You can use any of the effects shown but usually the main 2 needed for TV editing is Inner/Outer bevel.
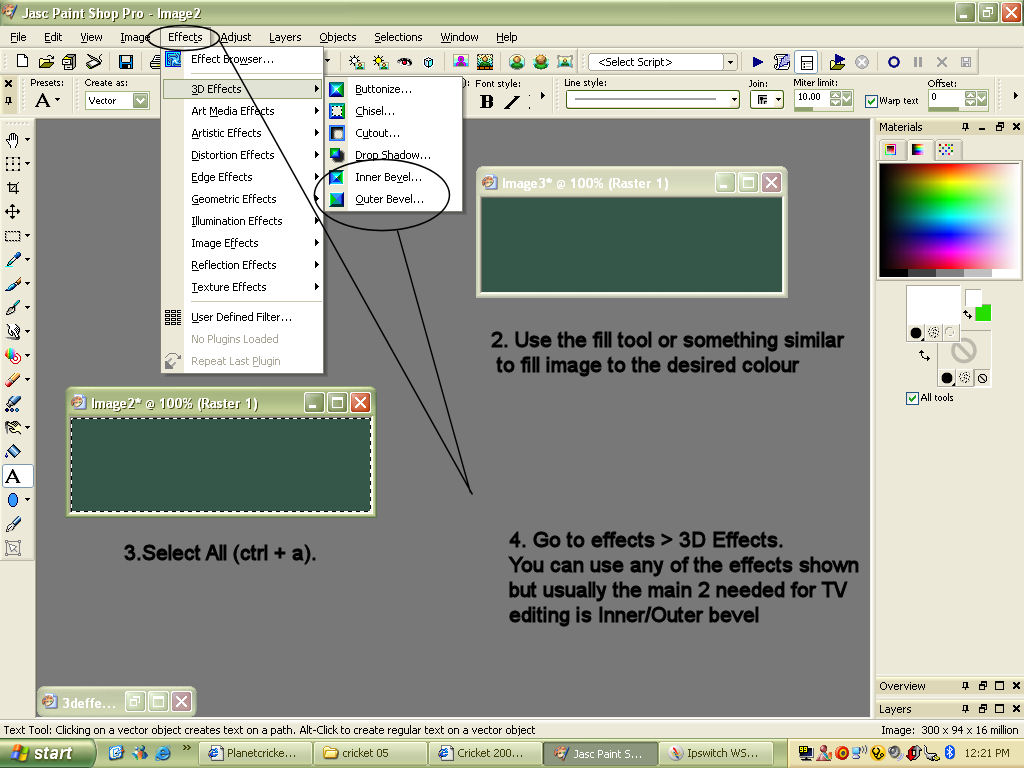
5. Pick your 3D effect I will be using the Outer bevel. Experiement around with the values until you get what you want.
6. You're done
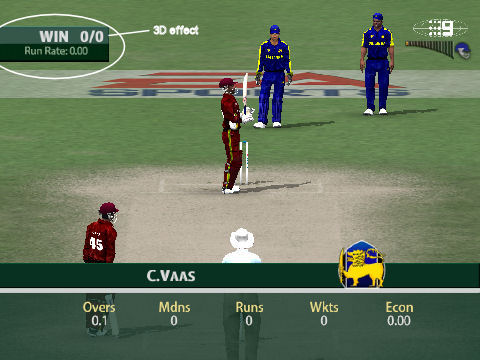
2.Transparent images
This is a really handy tool if you want to make gaps or TV logos.
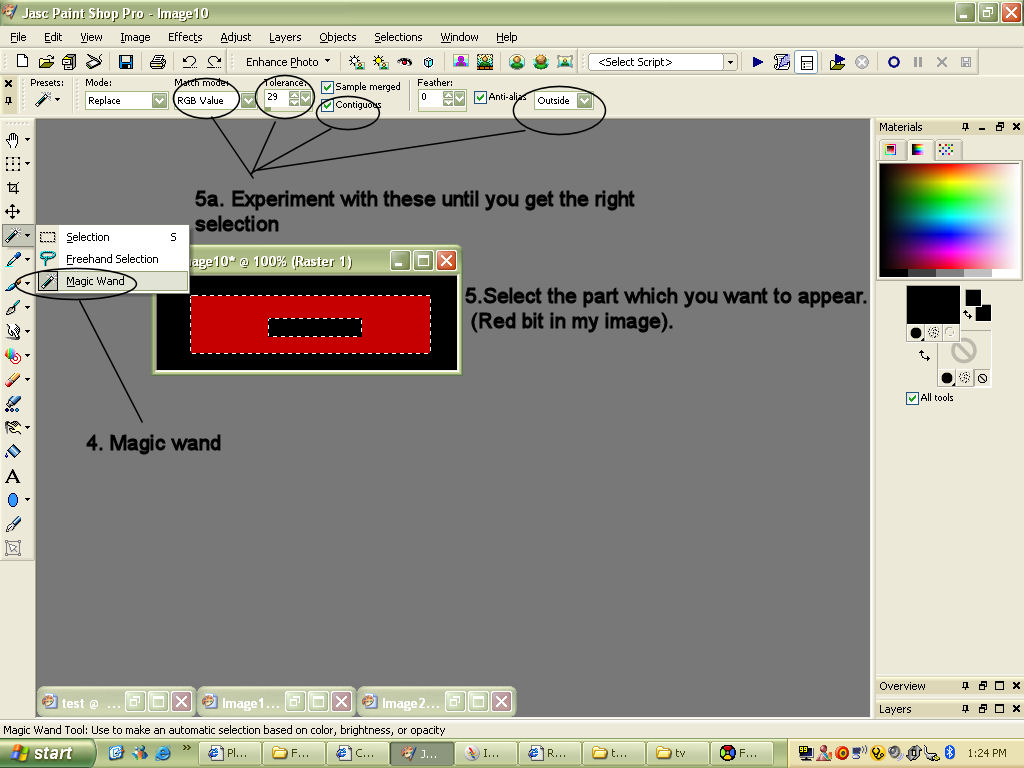
1. If you are starting from scratch I recommend you use a background colour that is different to the one you want to use.

2. In my image above I am using black as my background colour.
3. If you want to make a gap or hole in the image just make that area black as shown.
4. Once you have done your image, use the magic wand tool.
5.Select the part which you want to appear. (Red bit in my image). Note for my image I will need to select two parts so I used the shift key. Also my image is a basic one and so I didn't have any blackish bits showing up in my selection. 5a. To prevent that you will need to experiment with the following circles shown below until you get the selection you want.
6. Once you have got your selection. Go to Selections > Load/Save Selections > Save Selection to Alpha channel. Click ok
7. Now go to Layers > Load/Save Mask > Load Mask from Alpha channel.
8. Uncheck invert transparency if it is not already.
9. Your image should have white and grey boxes with your image.
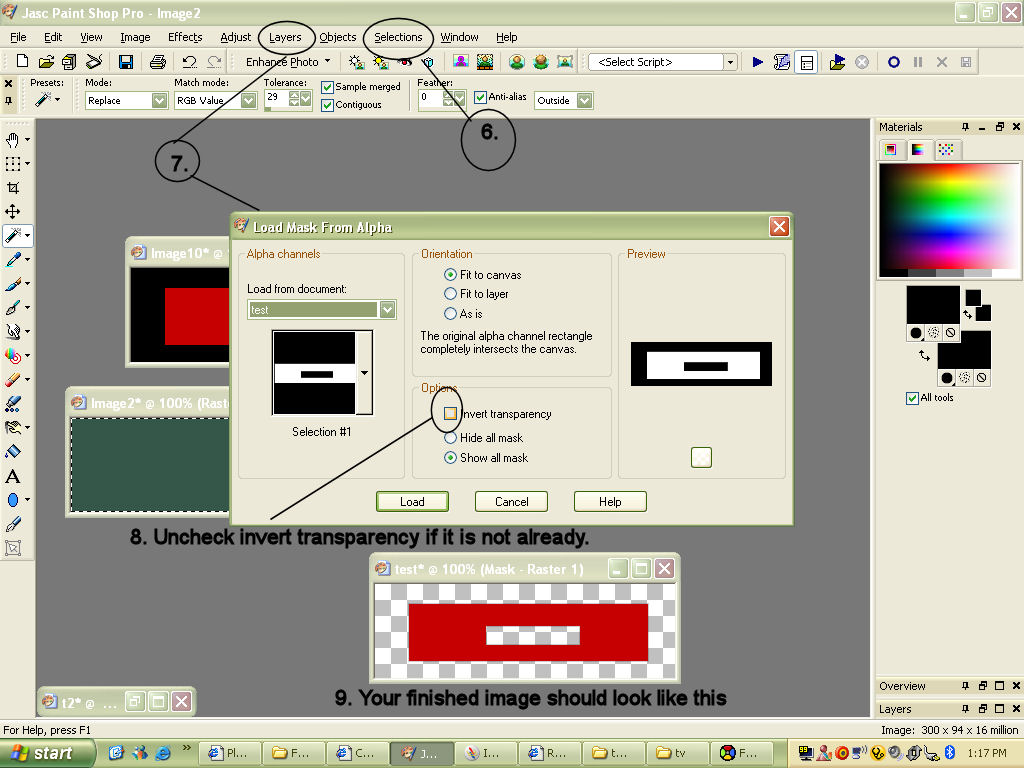
10. Save your file as a tga.
----------------------------------------------------------------------
2.XML Editing
1. Get the file attached below if you don't have it already.
2. Open the file in bigGUI.
3. Extract ig_scorebox_pc.rfe
4. Open this file in a text editing program. (You can use Notepad but I will be using Ultraedit32)
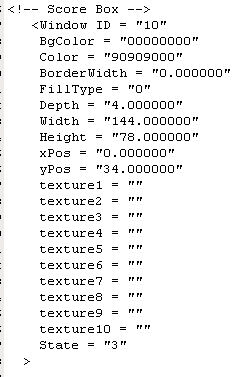
5. This part is fairly easy, all you have to do if configue your settings to what you want your tv overlay to look like. You will see comments like <!-- Score Box --> which mean just that so this will help you guys out in figuring out what you are editing.
Explaniation of some terms used in the game.
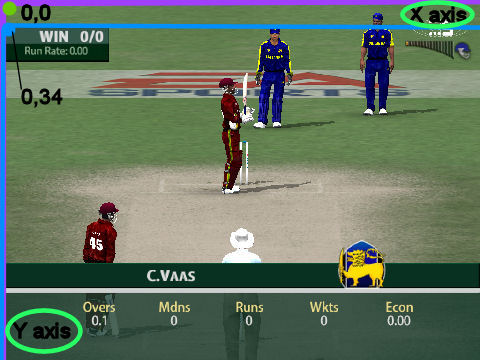
This window is basically the axis for your image. You only need to worry about
xPos = "0.000000"
yPos = "0.000000"
This is basically just like a graph or map. xPos as you can figure is just the x axis and yPos is the y axis. 0,0 is the top left corner as shown. If you enter this into the image your axis will start from there as shown below (The purple lines/axis)
My image however starts from x=0, y=34.(Blue line/axis) You will get a better idea what this is for later on.
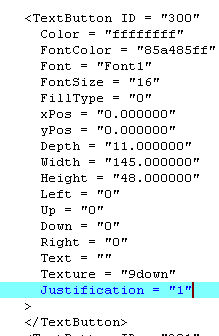
From the second image this is where most of the editing occurs. These are textbutton and you will find a lot of these.
Explaniation of the meaning above.
1. xPos, yPos - This is like above but this time it represents your texture/image. This is where that axis thing above comes into play. As i said above i put my axis at 0,34. Now my text button is showing 0,0 so this means the image will start at 0,34 because I haven't moved my image so it will start where I put my axis.
If i do move my x and y direction like my nine logo underneath the x axis word it will move to the place specified.
My nine logo is located at xPos = "550.000000"
yPos = "-10.000000"
So this means my nine logo will go across from my orginal axis (0,34) to move 550 in the x direction and 10 up (-10 means above the axis for this situation)
2. Font = "FontX" Replace X with 1,2,5, or 6.
3. Color = "ffffff00" - The ffffff is the color of the background. The 00 is the transperancy level. 00 is totally transparent, ff is no transparency. As you can see with my nine patch I made my image is semi transparent. Just pick a number in between 00 and ff. I choose CA. These are hex numbers by the way. (Usually you won't need this as you make your own texture but if you are too lazy to do this, just create a box with x width and y height and then put in the color you want)
4. FontColor = "eadb8aff" - Same as Color above but this changes the color of the font.
5. Justification = "0" - Just like the justification you find in MS Word this is the same but for games. If you set it to 0 nothing will happen. If you increase it to 1 or 2 it will justify accordingly. This basically is used for numbers which changes e.g. the score. At the start you would think you have position your text right as it will be 0/0. However this score may go off the texture when you score more like 111/1. This is where the justifcation comes into play. It will give itself enough room so that the number will fit in the specifed box.
6. This specified box i am talking about is just that. It looks like this
Width = "60.000000"
Height = "18.000000"
There are two versions of this.
-One is to determine the size of your texture.
-The other is for texts.
The first one is obvious what it does. The text part is just like a box but it doesn't show up. It is just a box where your text fits in. Make sure this box and the size of the image is the same or else the text will go outside of your image.
7. Depth = "1.000000" - This basically just means the priority this textbutton has. If textbutton 100 has depth = 1 while textbutton 200 has depth = 4, textbutton 100 will appear over textbutton 200. This is used for words in the game. If the opposite occured above textbutton 100 being depth 10 and textbutton 200 being depth 1 then textbutton 200 will appear over textbutton 100. Any text in the game is given Depth 1 so it will show up on your image.
8. Text = "8888/88" - This basically is what will show up in the game. (Note sometimes your text won't show if you try to replace a current text as this isn't editable via this file)
Some of the common Cricket 2005 texts are
8888/88 - Represents a number e.g 100/1, 100
Player Name - Player name
C.Player Namewwwsi - Caught.Player Name
9. Texture = "" - This is the most important thing for TV patching. This is where you name your textures. e.g Texture = "logo"
3.Installing files
BigGUI
I have already explained how to export the files needed for editing now I will explain how to import the files
1. Once you have finished editing (Explaniation of some of the meanings of some of the words in the file explained below) save the file as a rfe.
2. Back into bigGUI (if you have closed this open it and find 7ac69a95d810236a72e073135195d310.big) Import ig_scorebox_pc.rfe.
3. Close the file so it can be compressed. Now select this file and copy and paste it into x:/....EA Sports/Cricket 2004/
fshed
1. Open fshed005
2. Open 557e1a2a7bd98f3680af6f879c16d401.fsh
3. If you are using my 9 TV Patch you may not need to do this but you can if you want. Click one of the files on the left, expand the image. Export the file "name".
4. Open this in a hex editor. Change the name of the file to whatever you want. (This is what goes in texture=""). Save this.
5. Now to create a new object go to options > Add new > Object. Give the object a name. Click update.
6. Find this object you just created (it will be a sub directory in one of the files probably the one where you exported name)
7. Click object > Add new > Attachment. Find your "name" file and import.
8. Now your object will be like all the other objects and no longer a sub directory.
9. Depending on how you saved your image you have 2 ways to import.
-The first is for bmp files. Cick your object file (not name the parent file). Now either click the import to icon or object > import.
Click New, find your file. Make sure it appears how it should. Click update.
-The other way for tga files is to go to tools > graphic importer. Click open find you file. Like above make sure your image appears how it should. Click update.
10. Once all your images are in the fsh file save it as.
11. Now select this file and copy and paste it into x:/....EA Sports/Cricket 2004/
I hope you guys can understand this and other TV patch makers feel free to add your tips.
1.fshed005
2.bigGUI
3. Fshed005 Tga plugin
4. Graphics Editor (I will be using Paint Shop Pro 9 for this tutorial)
5. A hex editor (I will be using Ultraedit32). You can get a free one from http://www.download.com/Hackman-Hex-Editor-Lite/3000-2352_4-10354867.html?tag=lst-0-1
----------------------------------------------------------
This tutorial will have 3 sections
1. Graphics
2. XML editing
3. Installing files
-----------------------------------------------------------
1.Graphics
-There is not much I can teach you guys on this as a lot of the TV overlays will be different. What i can teach you is some tools you can use.
3D effects
If you want to create a 3D effect as shown below, here is how to do it:
1. Create a new image of whatever size you want but in the power of 2 range. e.g. 640 by 480, 32 by 32, 64 by 32 etc
2. Use the fill tool or something similar to fill image to the desired colour
3. Select All (ctrl + a).
4. Go to effects > 3D Effects. You can use any of the effects shown but usually the main 2 needed for TV editing is Inner/Outer bevel.
5. Pick your 3D effect I will be using the Outer bevel. Experiement around with the values until you get what you want.
6. You're done
2.Transparent images
This is a really handy tool if you want to make gaps or TV logos.
1. If you are starting from scratch I recommend you use a background colour that is different to the one you want to use.
2. In my image above I am using black as my background colour.
3. If you want to make a gap or hole in the image just make that area black as shown.
4. Once you have done your image, use the magic wand tool.
5.Select the part which you want to appear. (Red bit in my image). Note for my image I will need to select two parts so I used the shift key. Also my image is a basic one and so I didn't have any blackish bits showing up in my selection. 5a. To prevent that you will need to experiment with the following circles shown below until you get the selection you want.
6. Once you have got your selection. Go to Selections > Load/Save Selections > Save Selection to Alpha channel. Click ok
7. Now go to Layers > Load/Save Mask > Load Mask from Alpha channel.
8. Uncheck invert transparency if it is not already.
9. Your image should have white and grey boxes with your image.
10. Save your file as a tga.
----------------------------------------------------------------------
2.XML Editing
1. Get the file attached below if you don't have it already.
2. Open the file in bigGUI.
3. Extract ig_scorebox_pc.rfe
4. Open this file in a text editing program. (You can use Notepad but I will be using Ultraedit32)
5. This part is fairly easy, all you have to do if configue your settings to what you want your tv overlay to look like. You will see comments like <!-- Score Box --> which mean just that so this will help you guys out in figuring out what you are editing.
Explaniation of some terms used in the game.
This window is basically the axis for your image. You only need to worry about
xPos = "0.000000"
yPos = "0.000000"
This is basically just like a graph or map. xPos as you can figure is just the x axis and yPos is the y axis. 0,0 is the top left corner as shown. If you enter this into the image your axis will start from there as shown below (The purple lines/axis)
My image however starts from x=0, y=34.(Blue line/axis) You will get a better idea what this is for later on.
From the second image this is where most of the editing occurs. These are textbutton and you will find a lot of these.
Explaniation of the meaning above.
1. xPos, yPos - This is like above but this time it represents your texture/image. This is where that axis thing above comes into play. As i said above i put my axis at 0,34. Now my text button is showing 0,0 so this means the image will start at 0,34 because I haven't moved my image so it will start where I put my axis.
If i do move my x and y direction like my nine logo underneath the x axis word it will move to the place specified.
My nine logo is located at xPos = "550.000000"
yPos = "-10.000000"
So this means my nine logo will go across from my orginal axis (0,34) to move 550 in the x direction and 10 up (-10 means above the axis for this situation)
2. Font = "FontX" Replace X with 1,2,5, or 6.
3. Color = "ffffff00" - The ffffff is the color of the background. The 00 is the transperancy level. 00 is totally transparent, ff is no transparency. As you can see with my nine patch I made my image is semi transparent. Just pick a number in between 00 and ff. I choose CA. These are hex numbers by the way. (Usually you won't need this as you make your own texture but if you are too lazy to do this, just create a box with x width and y height and then put in the color you want)
4. FontColor = "eadb8aff" - Same as Color above but this changes the color of the font.
5. Justification = "0" - Just like the justification you find in MS Word this is the same but for games. If you set it to 0 nothing will happen. If you increase it to 1 or 2 it will justify accordingly. This basically is used for numbers which changes e.g. the score. At the start you would think you have position your text right as it will be 0/0. However this score may go off the texture when you score more like 111/1. This is where the justifcation comes into play. It will give itself enough room so that the number will fit in the specifed box.
6. This specified box i am talking about is just that. It looks like this
Width = "60.000000"
Height = "18.000000"
There are two versions of this.
-One is to determine the size of your texture.
-The other is for texts.
The first one is obvious what it does. The text part is just like a box but it doesn't show up. It is just a box where your text fits in. Make sure this box and the size of the image is the same or else the text will go outside of your image.
7. Depth = "1.000000" - This basically just means the priority this textbutton has. If textbutton 100 has depth = 1 while textbutton 200 has depth = 4, textbutton 100 will appear over textbutton 200. This is used for words in the game. If the opposite occured above textbutton 100 being depth 10 and textbutton 200 being depth 1 then textbutton 200 will appear over textbutton 100. Any text in the game is given Depth 1 so it will show up on your image.
8. Text = "8888/88" - This basically is what will show up in the game. (Note sometimes your text won't show if you try to replace a current text as this isn't editable via this file)
Some of the common Cricket 2005 texts are
8888/88 - Represents a number e.g 100/1, 100
Player Name - Player name
C.Player Namewwwsi - Caught.Player Name
9. Texture = "" - This is the most important thing for TV patching. This is where you name your textures. e.g Texture = "logo"
3.Installing files
BigGUI
I have already explained how to export the files needed for editing now I will explain how to import the files
1. Once you have finished editing (Explaniation of some of the meanings of some of the words in the file explained below) save the file as a rfe.
2. Back into bigGUI (if you have closed this open it and find 7ac69a95d810236a72e073135195d310.big) Import ig_scorebox_pc.rfe.
3. Close the file so it can be compressed. Now select this file and copy and paste it into x:/....EA Sports/Cricket 2004/
fshed
1. Open fshed005
2. Open 557e1a2a7bd98f3680af6f879c16d401.fsh
3. If you are using my 9 TV Patch you may not need to do this but you can if you want. Click one of the files on the left, expand the image. Export the file "name".
4. Open this in a hex editor. Change the name of the file to whatever you want. (This is what goes in texture=""). Save this.
5. Now to create a new object go to options > Add new > Object. Give the object a name. Click update.
6. Find this object you just created (it will be a sub directory in one of the files probably the one where you exported name)
7. Click object > Add new > Attachment. Find your "name" file and import.
8. Now your object will be like all the other objects and no longer a sub directory.
9. Depending on how you saved your image you have 2 ways to import.
-The first is for bmp files. Cick your object file (not name the parent file). Now either click the import to icon or object > import.
Click New, find your file. Make sure it appears how it should. Click update.
-The other way for tga files is to go to tools > graphic importer. Click open find you file. Like above make sure your image appears how it should. Click update.
10. Once all your images are in the fsh file save it as.
11. Now select this file and copy and paste it into x:/....EA Sports/Cricket 2004/
I hope you guys can understand this and other TV patch makers feel free to add your tips.
Attachments
Last edited: